
Design 1: Sweetheart Blush

Sweetheart Blush is the epitome of February romance wrapped in simplicity. This design features a dreamy blush pink base that flatters every skin tone, creating a soft, feminine canvas. The real magic happens on your ring finger, where a delicate red heart sits near the cuticle, symbolizing love without overwhelming the design. It’s perfect for those who want to celebrate Valentine’s Day with subtlety and grace.
Colors Used: Soft blush pink (main color), classic red (accent heart)
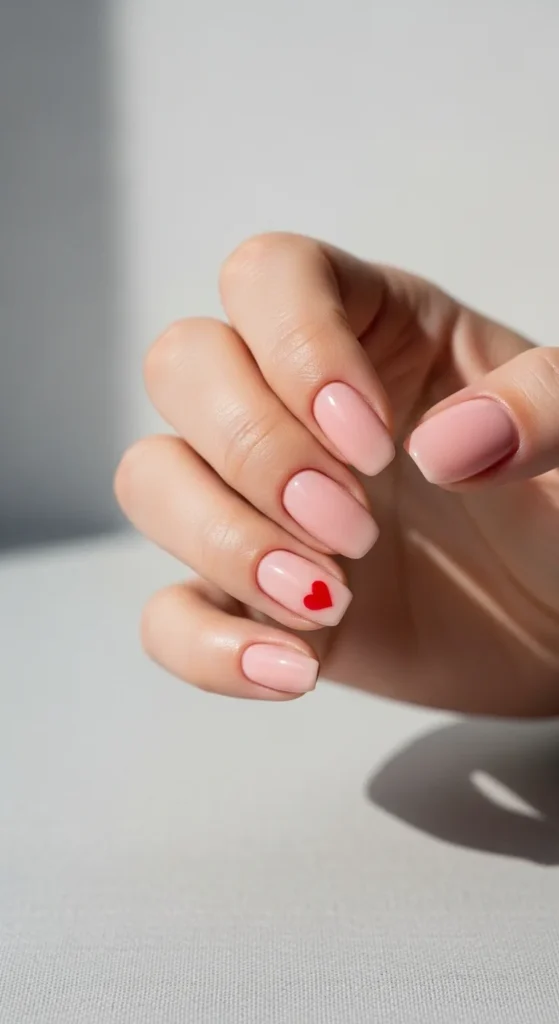
Application Tips: Start with a clear base coat to protect your nails. Apply two thin coats of blush pink polish to all nails, allowing each coat to dry completely. For the ring finger heart, use a fine nail art brush or dotting tool dipped in red polish. Create the heart by placing two small dots side by side, then drag downward to form the point. Finish with a glossy top coat for a salon-quality shine that lasts up to two weeks.
Design 2: Frosted Berry
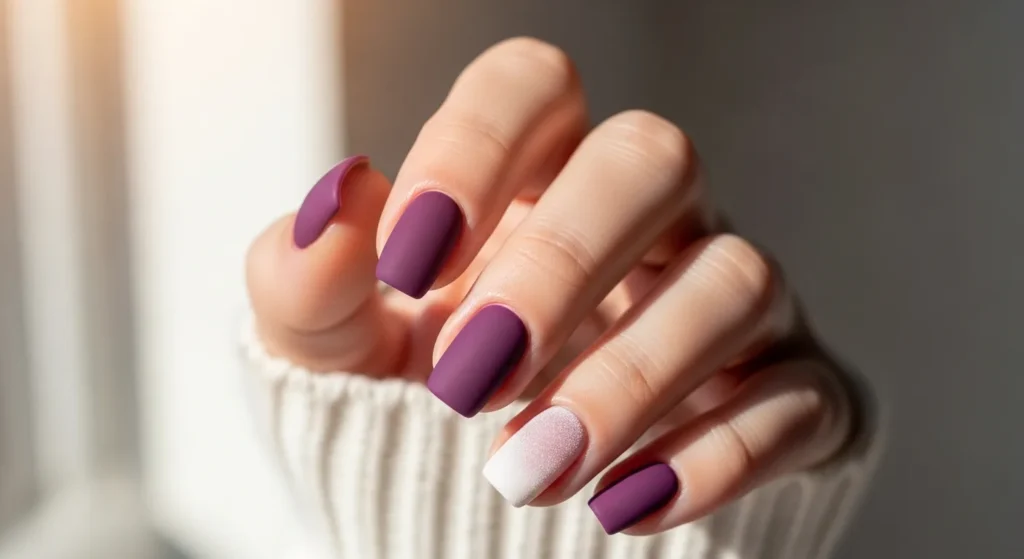
Frosted Berry brings the cozy warmth of February indoors with its rich, velvety tones. This design combines a luxurious berry purple base with a soft white frost gradient on select fingers, mimicking the look of winter berries dusted with morning frost. The matte finish adds a modern, sophisticated touch that’s both trendy and timeless. It’s the perfect choice for those chilly February days when you want your nails to reflect the season’s beauty.
Colors Used: Deep berry purple (base), soft white (gradient accent), matte top coat
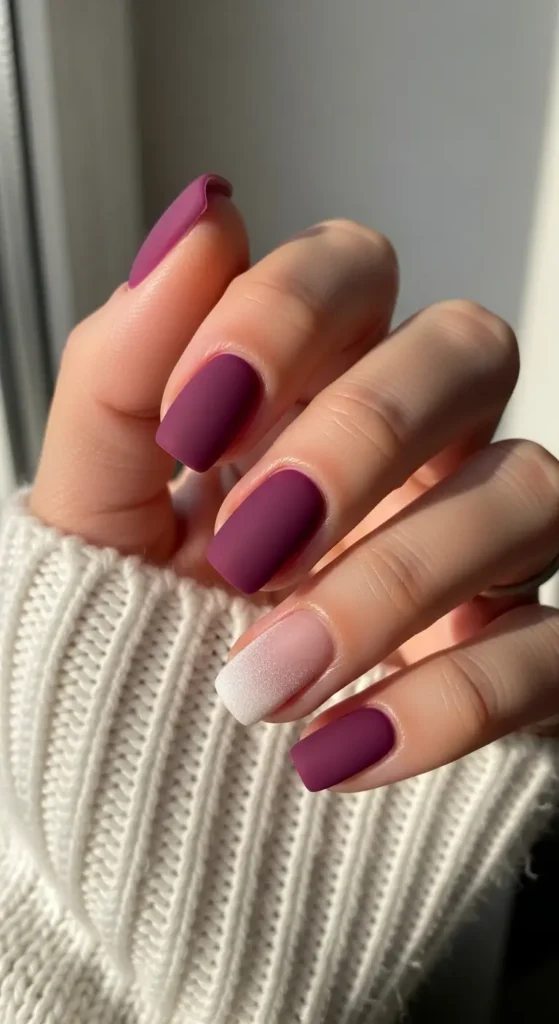
Application Tips: Apply a base coat first. Paint all nails with two coats of berry purple polish. While the polish is still slightly tacky on the thumb and middle finger, use a makeup sponge to dab white polish from the tip downward, creating a gradient effect. Blend gently for a seamless transition. Once completely dry, apply a matte top coat to all nails for that frosted finish. The matte texture transforms the look from ordinary to extraordinary.
Design 3: Love Letter Lines
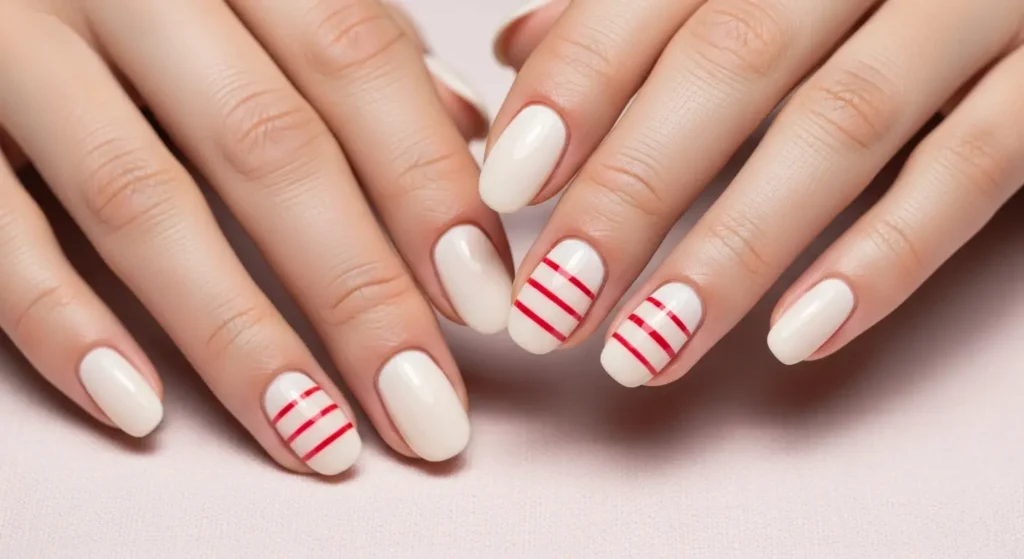
Love Letter Lines is a nostalgic nod to handwritten romance and heartfelt February messages. This minimalist design features a creamy off-white base that evokes vintage stationery, with thin red horizontal lines on accent nails that mimic the ruled lines of classic love letters. It’s understated yet meaningful—perfect for the romantic at heart who appreciates subtle symbolism. This design whispers elegance and tells a story without saying a word.
Colors Used: Creamy off-white (base), bright red (line accents)
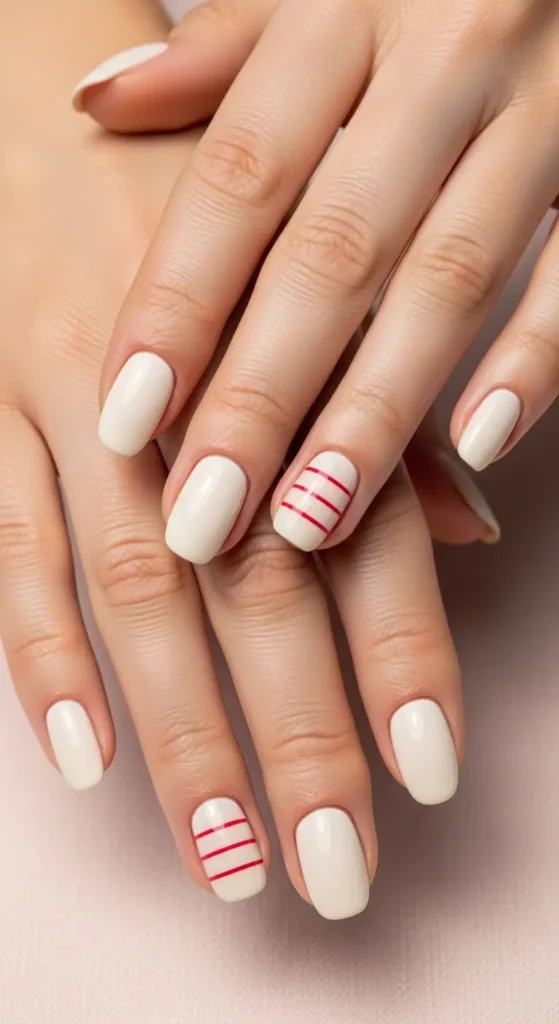
Application Tips: Begin with a base coat. Apply two coats of off-white polish to all nails, ensuring even coverage. Once dry, use a thin striping brush or nail art pen with red polish to draw 2-3 thin horizontal lines across the middle of your index and ring finger nails. Keep your hand steady and work slowly for clean, straight lines. A striping tape can help if you want perfectly straight edges—just apply, paint over, and remove carefully. Seal with a clear top coat to protect your design and add shine.
Design 4: Cherry Blossom Whisper
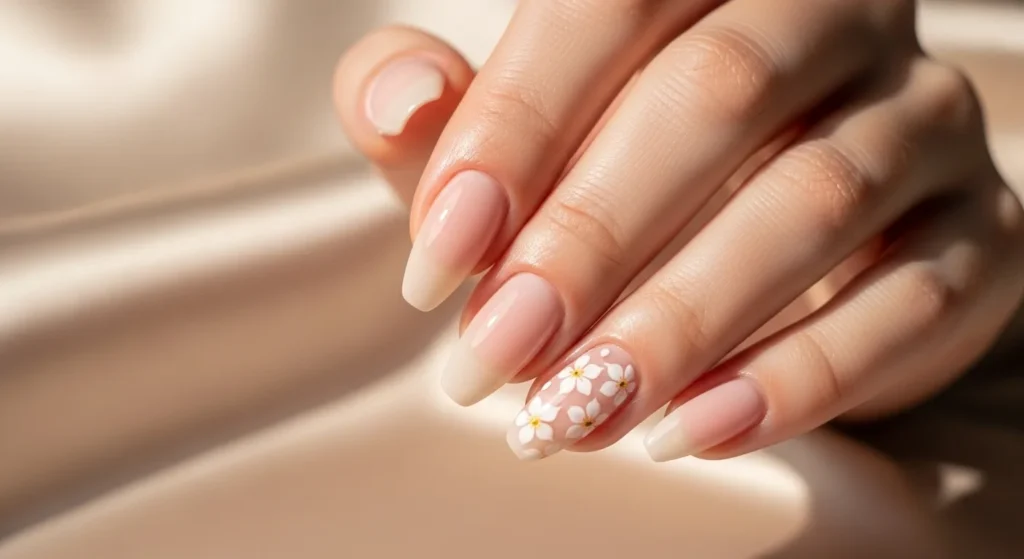
Cherry Blossom Whisper captures the gentle promise of spring arriving at February’s end. This ethereal design pairs a sheer pale pink nude base with delicate white cherry blossoms adorned with tiny yellow centers. The flowers are strategically placed on accent nails to create visual interest without overwhelming the design. It’s a breath of fresh air—romantic, feminine, and perfect for those who dream of warmer days ahead while still embracing February’s charm.
Colors Used: Sheer pale pink nude (base), pure white (flower petals), soft yellow (flower centers)
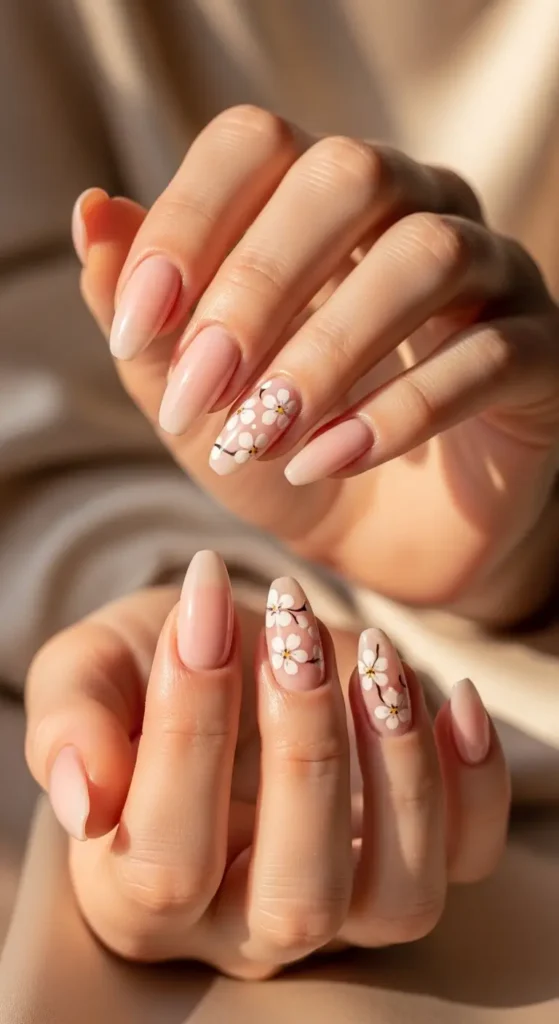
Application Tips: Start with a base coat. Apply two thin coats of sheer pale pink polish to all nails for a natural, barely-there look. Once dry, use a small dotting tool to create the cherry blossoms on your ring finger and pinky. Make five small white dots in a circular pattern to form petals, then add a tiny yellow dot in the center. You can create 1-2 flowers per accent nail. The key is keeping them small and delicate. Seal with a glossy top coat to blend everything together and add dimension.
Design 5: Velvet Valentine

Velvet Valentine is romance redefined with depth and sophistication. This design showcases a rich burgundy red that’s deeper and more complex than traditional Valentine’s red, finished with a luxurious matte texture that feels as good as it looks. The middle finger features a glossy heart in the same shade, creating a stunning textural contrast that catches the eye. It’s bold yet refined—perfect for date nights, Valentine’s celebrations, or anytime you want to feel effortlessly elegant.
Colors Used: Deep burgundy red (all nails), matte top coat, glossy top coat (accent heart)
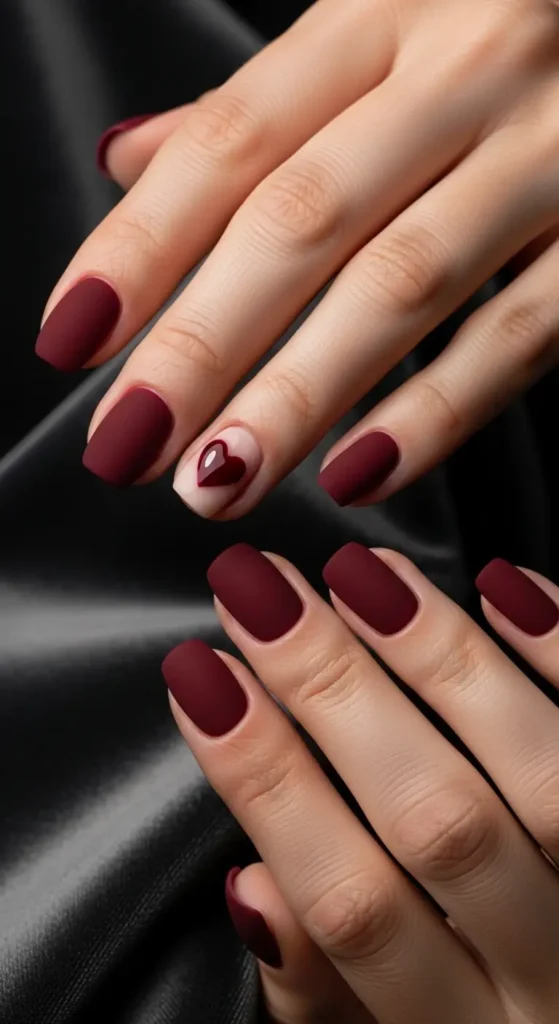
Application Tips: Apply a base coat to protect your nails. Paint all nails with two coats of deep burgundy red polish, allowing proper drying time between coats. Apply matte top coat to all nails. Once the matte finish is completely dry, use a small brush to carefully paint a heart shape on the middle finger nail, then immediately apply glossy top coat only to that heart while avoiding the matte surrounding area. This creates the beautiful texture contrast. For the heart, you can use a stencil or freehand it with a thin brush for a more organic look.
Design 6: Snowflake Elegance
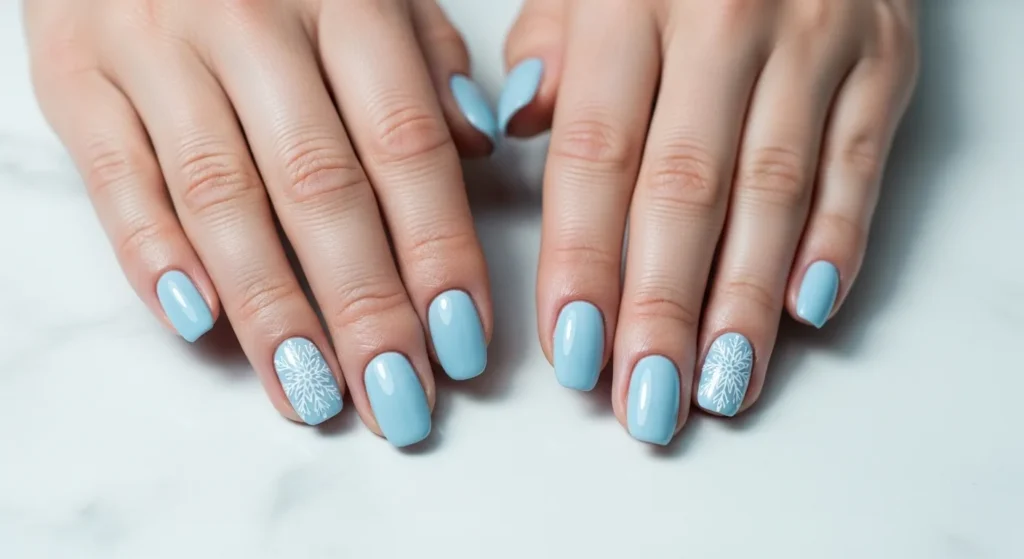
Snowflake Elegance celebrates February’s winter beauty with a frosty, sophisticated design. The soft icy blue base evokes clear winter skies and frozen landscapes, while delicate white snowflakes on accent nails add intricate detail and visual interest. Each snowflake is unique, just like in nature, making this design both artistic and meaningful. It’s perfect for those who love winter’s magic and want to carry a piece of it on their fingertips throughout February.
Colors Used: Soft icy blue (base), pure white (snowflake details)

Application Tips: Begin with a base coat. Apply two even coats of icy blue polish to all nails. Once completely dry, create snowflakes on your thumb and ring finger using a thin nail art brush or dotting tool with white polish. Start with a small cross (+), then add an X through it, and finish with tiny dots or lines at each endpoint. You can also use snowflake nail stickers or stamping plates for more consistent results. The key is keeping the snowflakes delicate and centered. Finish with a glossy top coat to make the white details pop against the blue background.
Design 7: Cinnamon Sugar
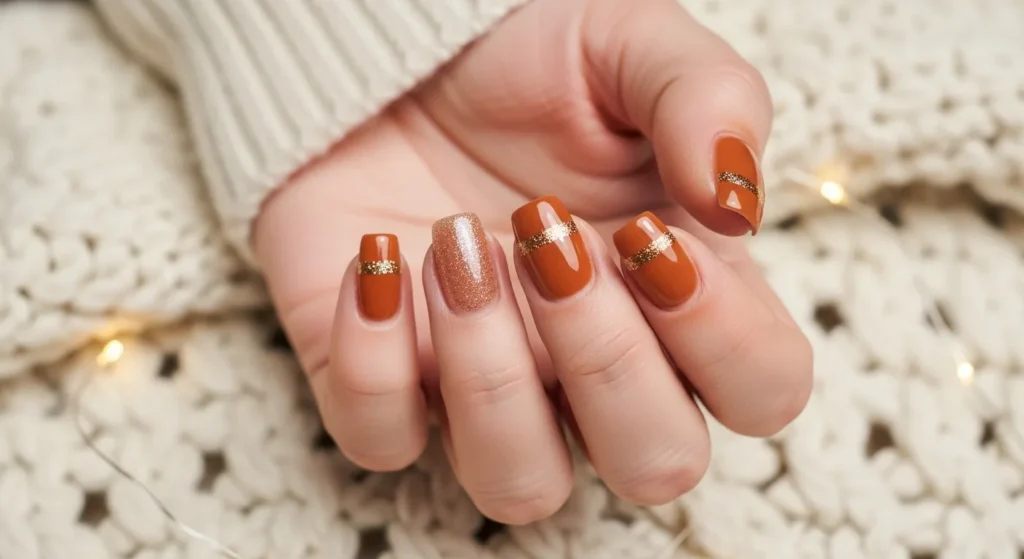
Cinnamon Sugar wraps your nails in the cozy warmth of February comfort. This design features a delicious caramel brown base with a subtle shimmer that resembles sparkling sugar crystals catching the light. Thin gold glitter lines on accent nails add just the right amount of sparkle without going overboard. It’s like wrapping your hands in a warm blanket with a cup of hot cocoa—comforting, sweet, and absolutely perfect for those cozy February evenings at home.
Colors Used: Warm caramel brown with shimmer (base), gold glitter (accent lines)

Application Tips: Start with a base coat. Apply two coats of shimmery caramel brown polish to all nails, allowing each coat to dry thoroughly. For the gold glitter accent, you have two options: use a thin striping brush with gold glitter polish to paint a horizontal line across the middle of your index and pinky nails, or apply thin striping tape, paint over with gold glitter, and carefully remove the tape for a perfect line. The shimmer in the base polish will complement the gold beautifully. Seal everything with a clear top coat to smooth the texture and extend wear time.
Design 8: Rose Quartz Dream
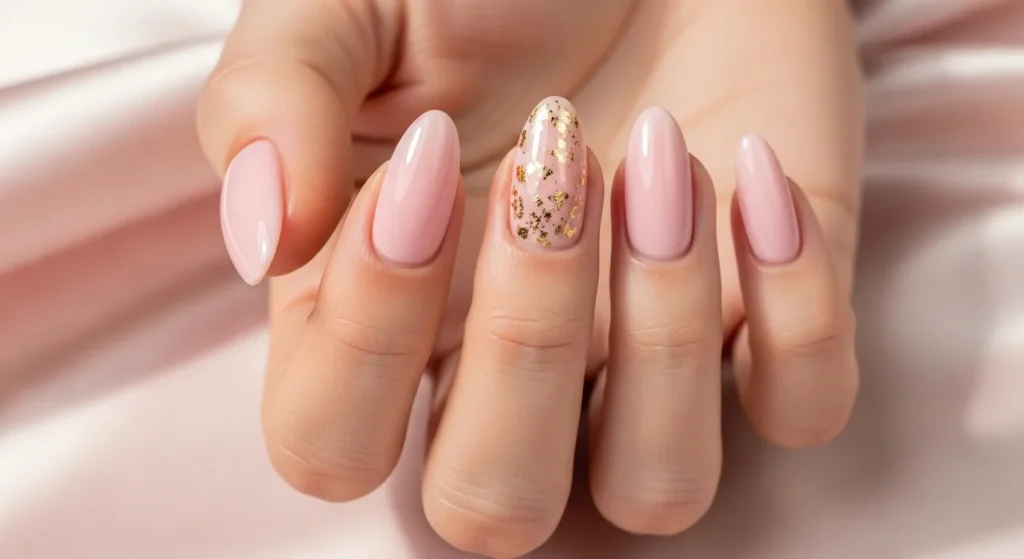
Rose Quartz Dream channels the healing, loving energy of its namesake crystal into a stunning nail design. The milky rose quartz pink base is universally flattering and radiates feminine energy, while tiny gold foil flakes on the middle finger add a touch of luxury and sparkle. This design is all about self-love and gentle beauty—perfect for February when we celebrate all forms of love, including the love we give ourselves. It’s elegant enough for any occasion yet simple enough for everyday wear.
Colors Used: Milky rose quartz pink (base), gold foil flakes (accent)

Application Tips: Apply a base coat first. Paint all nails with two coats of milky rose quartz pink polish. While the second coat on your middle finger is still slightly wet, use tweezers or a toothpick to place small pieces of gold foil flakes near the cuticle area. Press gently to adhere. You can also use gold foil adhesive for better staying power. Once everything is dry, apply a thick layer of glossy top coat to seal the foil pieces and create a smooth, even surface. The top coat will also enhance the milky quality of the pink and make the gold shimmer beautifully.
Design 9: Chocolate Truffle

Chocolate Truffle is pure indulgence for your fingertips. This decadent design features a deep, rich chocolate brown that’s as luxurious as it sounds, finished with a glossy shine that resembles the smooth coating of a fine chocolate truffle. Three rose gold metallic dots on the ring finger add a touch of elegance and sophistication, like gold leaf on gourmet chocolates. It’s the perfect design for chocolate lovers and anyone who wants to treat themselves to something special this February.
Colors Used: Deep chocolate brown (base), rose gold metallic (accent dots)
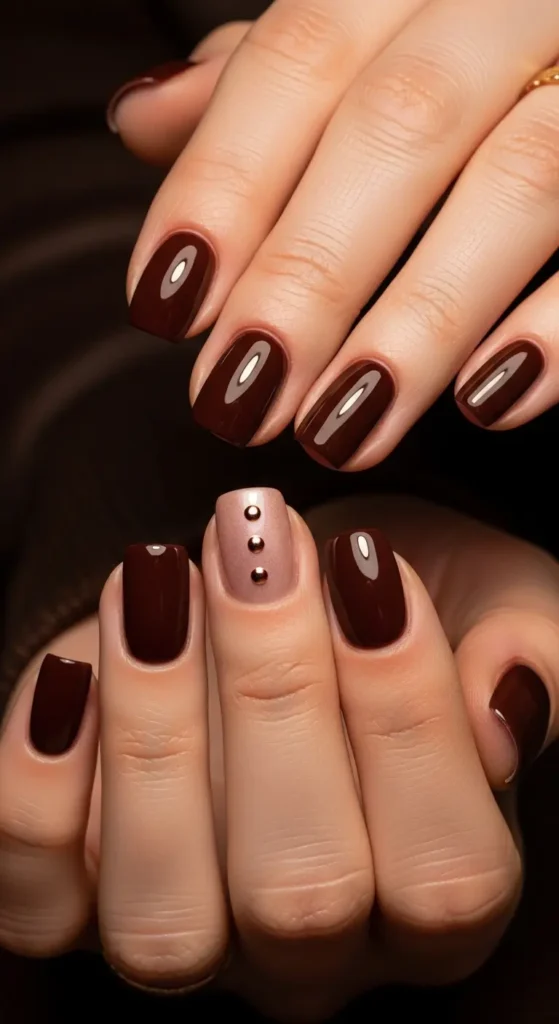
Application Tips: Start with a base coat to prevent staining from the dark polish. Apply two to three thin coats of deep chocolate brown polish to all nails, allowing proper drying time between coats for even, opaque coverage. Once completely dry, use a small dotting tool dipped in rose gold metallic polish to create three evenly-spaced dots down the center of your ring finger nail. Start near the cuticle and work toward the tip, keeping the dots uniform in size. Finish with a glossy top coat to enhance the truffle-like shine and protect your design. The contrast between the deep brown and rose gold is absolutely stunning.
Design 10: Pearl Romance
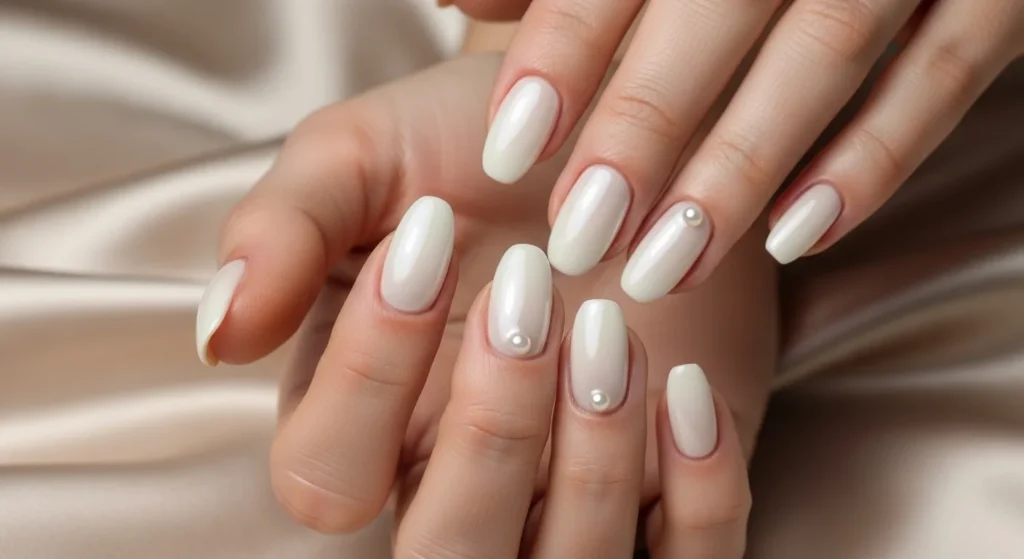
Pearl Romance embodies timeless elegance and classic beauty. The soft ivory cream base has a subtle pearl-like sheen that catches the light beautifully, creating dimension and sophistication. Small pearl embellishments on accent nails add a touch of luxury and bridal-worthy charm. This design is perfect for February weddings, romantic dinners, or any special occasion where you want to look effortlessly elegant. It’s understated yet impactful—proving that sometimes the simplest designs are the most beautiful.
Colors Used: Soft ivory cream with pearl sheen (base), small pearl embellishments (accents)
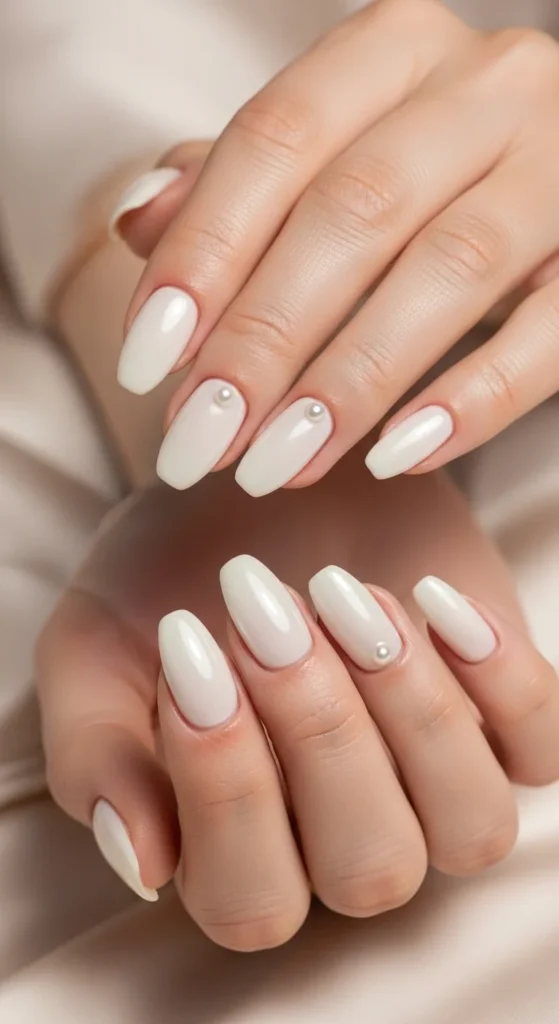
Application Tips: Apply a base coat first. Paint all nails with two coats of ivory cream polish with pearl sheen. While the polish on your thumb and middle finger is still slightly tacky, use tweezers to carefully place a small pearl embellishment near the base on one side of the nail. Press gently to secure. You can use nail glue for stronger adhesion if needed. Once everything is completely dry, carefully apply a clear top coat to all nails, being gentle around the pearl embellishments to keep them secure. The top coat will enhance the pearlescent quality and create a cohesive, polished look.
Design 11: Dusty Rose Minimalist

Dusty Rose Minimalist is for the modern woman who appreciates understated beauty. This contemporary design features a muted dusty rose pink that’s sophisticated and versatile, paired with a single thin vertical white line on the index finger for a minimalist accent. It’s the epitome of “less is more”—clean, chic, and effortlessly stylish. Perfect for professionals, minimalism lovers, or anyone who wants beautiful nails without fuss. This design transitions seamlessly from office to evening and complements any outfit.
Colors Used: Muted dusty rose pink (base), crisp white (vertical line accent)
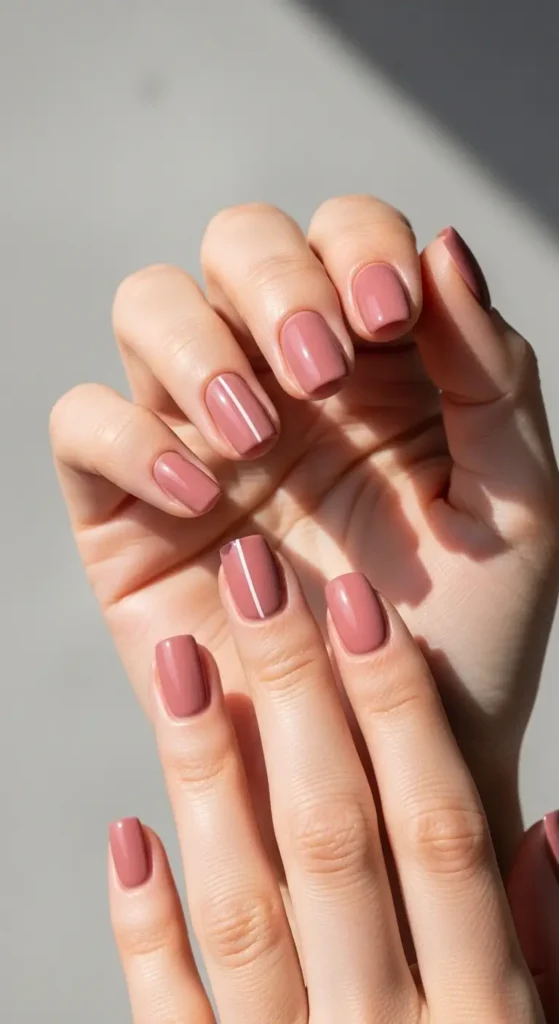
Application Tips: Begin with a base coat. Apply two even coats of dusty rose pink polish to all nails, ensuring smooth, streak-free coverage. Once completely dry, use a thin striping brush or nail art pen with white polish to draw a single vertical line along one side of your index finger nail, from cuticle to tip. Keep your hand steady and work in one smooth motion for the cleanest line. You can also use thin striping tape as a guide—apply it vertically, paint alongside it, and remove carefully. Finish with a semi-glossy top coat for a natural, modern finish that’s not too shiny.
Design 12: Lavender Fields
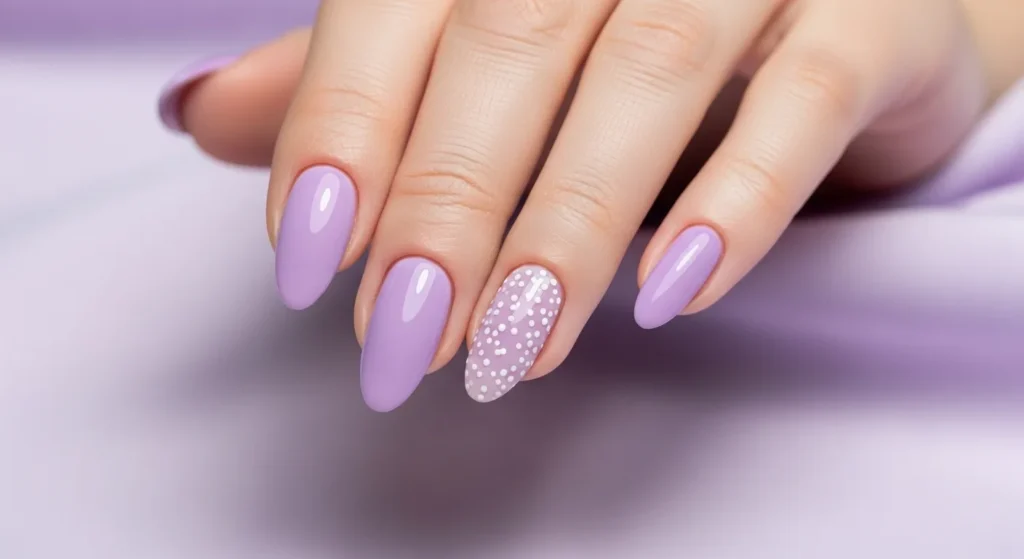
Lavender Fields transports you to peaceful meadows and the promise of spring. This dreamy design features a soft lavender purple base that’s both calming and beautiful, with tiny white dots scattered on accent nails like lavender blossoms swaying in the breeze. It’s romantic, whimsical, and perfect for February’s transition from winter to spring. The soft purple is universally flattering and brings a sense of tranquility to your everyday life. It’s simple enough to create at home but looks professionally done.
Colors Used: Soft lavender purple (base), pure white (scattered dots)
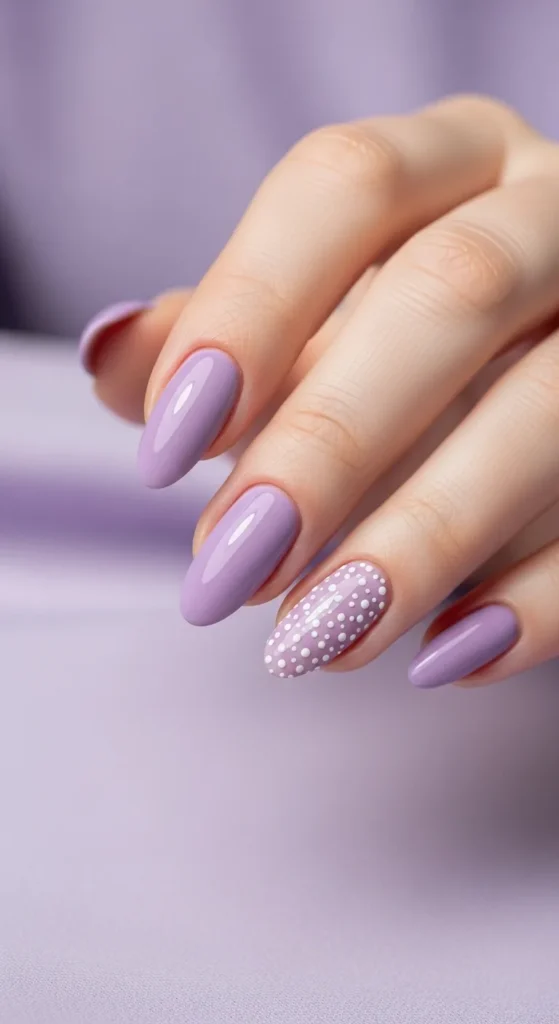
Application Tips: Start with a base coat. Apply two smooth coats of soft lavender purple polish to all nails, allowing each coat to dry completely. Once dry, use a small dotting tool or the tip of a toothpick dipped in white polish to create tiny dots randomly scattered across your ring finger and thumb nails. Vary the spacing and placement for a natural, organic look—don’t make them too uniform. The dots should resemble tiny flowers or gentle snowfall. You can create anywhere from 5-10 dots per accent nail depending on your preference. Seal everything with a glossy top coat to blend the dots into the base and add beautiful shine.


